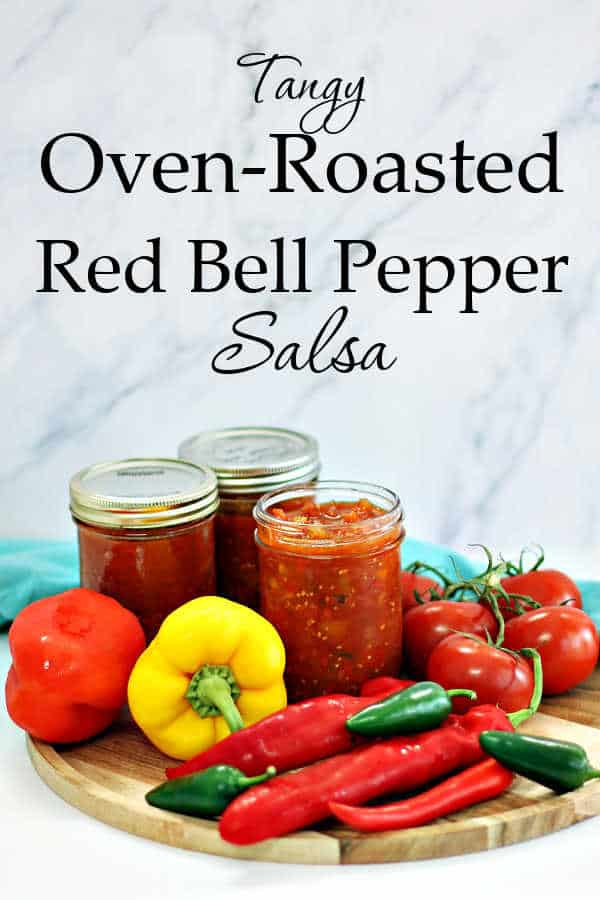
Tangy Oven-Roasted Red Bell Pepper Salsa Recipe
This post contains Affiliate Links – visit my disclosure page.
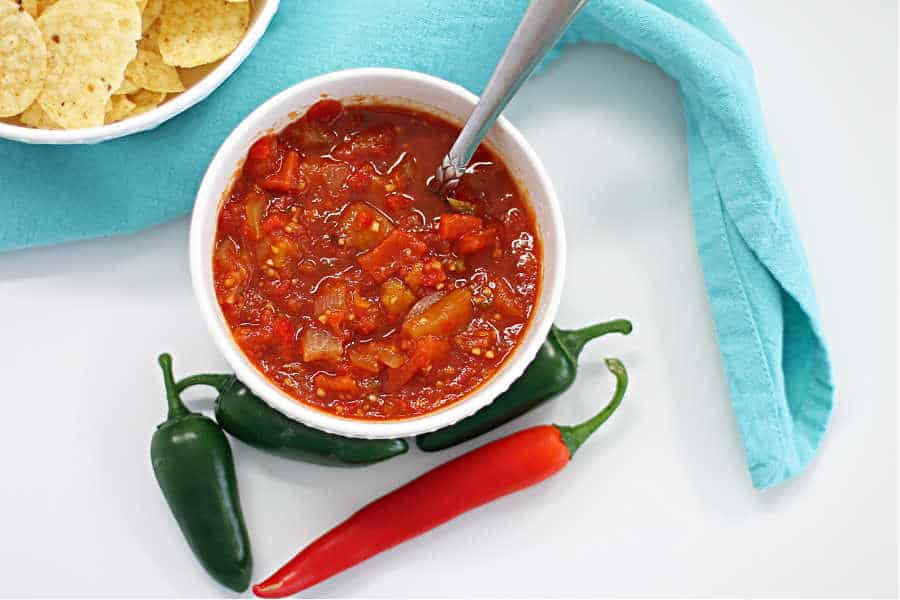
You will love the smoky flavor of this salsa. The roasted bell peppers combined with fresh ingredients create the perfect Salsa canning recipe. The tangy and sweet taste is a perfect snack with tortilla chips, served as a condiment over your favorite protein, or a side for your next Mexican feast.
This is our favorite smoky, naturally sweet – NOT HOT – homemade salsa recipe. Don’t get me wrong, it still has an afterburn, but it’s milder than our regular Salsa. Ian loves to help me with this one as my chopper and official taste tester.
Fall is the perfect time to gather the fresh tomatoes and, hot and sweet peppers you will need to make this delicious salsa. Oven-roasting the peppers at high heat adds a smoky rich flavor. Then quickly blend in a food processor, simmer over the stove until cooked down and process. There is nothing better than opening this salsa in the dead of winter in front of the fireplace watching your favorite movie. Consider making a double batch. This is a great recipe to give as gifts during the holidays. Fill a gift basket with a jar of your oven-roasted red pepper salsa, a bag of chips and a recipe card. So much better than restaurant-style salsa.
Ingredients:
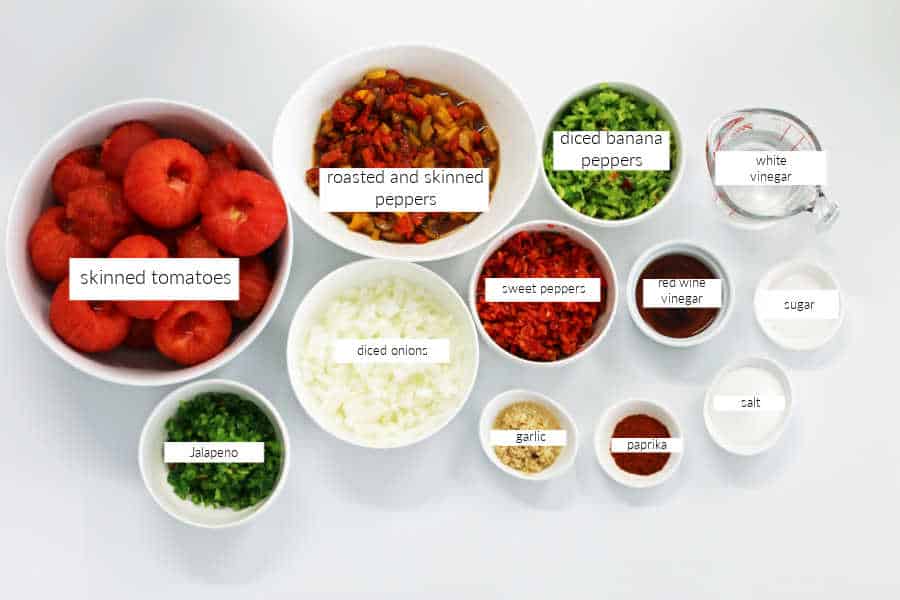
Fresh Tomatoes – we grow a variety of tomatoes each year and use them all in our salsas. Roma tomatoes, heirlooms, beefsteak, and plum tomatoes, all end up in the pot (except cherry tomatoes, LOL, they are too small to peel, so I save them for roasted tomato soup). No canned tomatoes here just fresh produce.
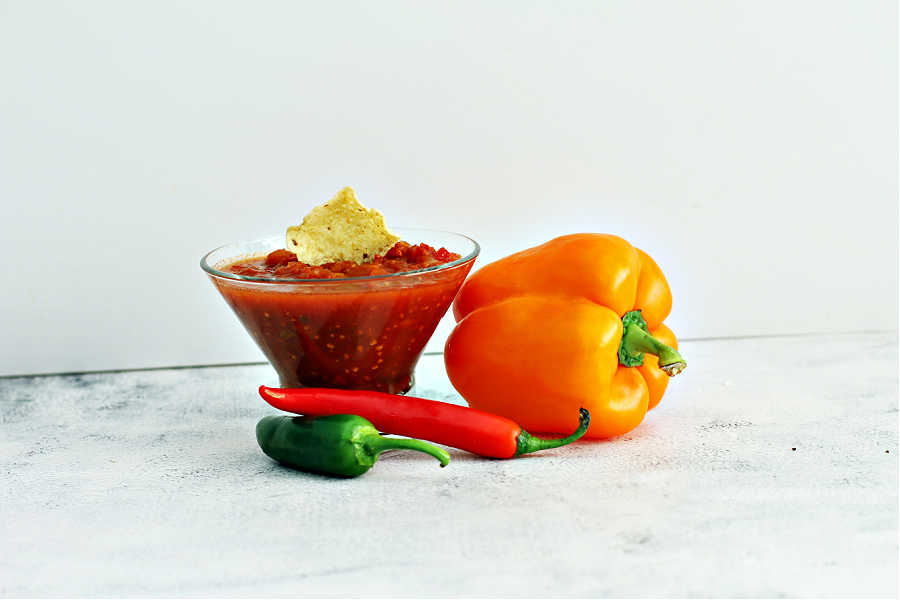
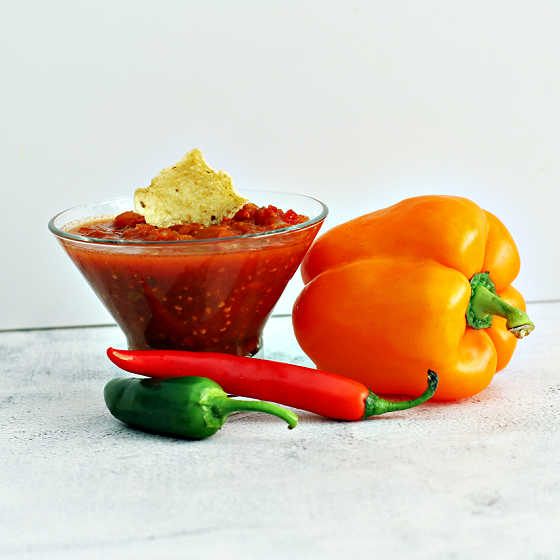
Red Bell Peppers, yellow peppers and orange peppers. Use them all. I refrain from green peppers as they are a bit sour for my liking. Fall is the peak season for beautiful plump red peppers right from the vine. The sweet flavor balances out the hot peppers .
Jalapeno Peppers – hot and spicy, remove the seeds, or leave some in for more heat if you enjoy spicy food. Note, you could also add Anaheim peppers if you want a little less heat than Jalapeno peppers provide.
Red Chili Peppers – yes the long skinny ones. This intensely spicy pepper adds the perfect amount of heat and flavor. (I remove the seeds).
Onion – just harvested, grab a couple of the big yellow or white ones, chopped in the food processor and not roasted, to maintain the strong raw flavor.
Banana Peppers – long, sweet and juicy, they add color and flavor.
White Vinegar – adds the acid to help preserve the salsa.
Red Wine Vinegar – a flavor-enhancing tang that you taste at the end of your bite.
Cloves of Garlic – love the burst of flavor garlic adds
Sugar – to mellow out the flavors
Paprika – a little addition of smoldering spice
Pickling Salt – helps preserve the texture and color of the salsa ingredients.
Lime Juice – more acid for preserving along with that beautiful sour taste.
Instructions:
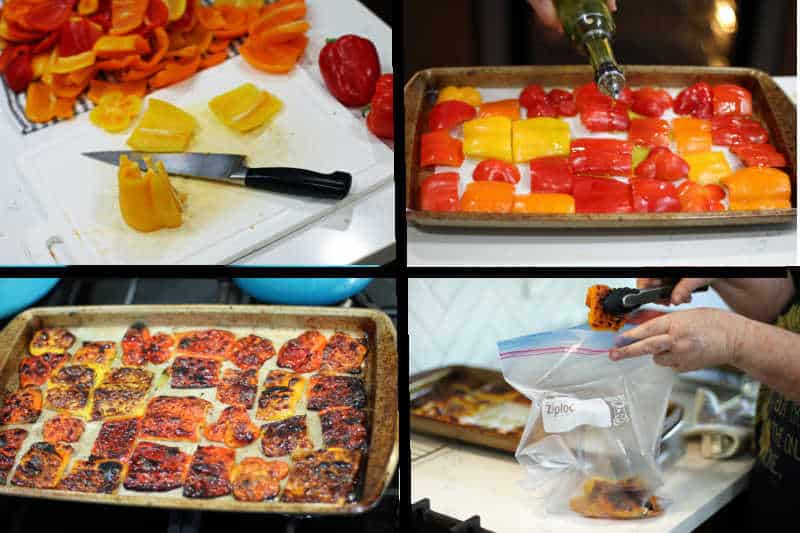
How to Roast the Red Bell Peppers:
One of my favorite ways to roast peppers:
- Turn the oven broiler to high and set the shelf in the middle of the oven.
- Use your ugly roasting sheet pan or rimmed baking sheet with parchment paper for roasting.
- Wash, and core the red peppers, (I also use yellow and orange for color) cutting them into 4 -5 pieces so they lay flat on the roasting tray.
- Fill the sheet pan with your cut peppers, skin side up.
- Once the roasting sheet is full, drizzle the peppers with good-quality olive oil and place the sheet in the oven for about 20 minutes or until the peppers are completely charred. (watch closely to ensure they don’t burn through).
NOTE – the more charred the peppers are, the easier they will be to peel.
How to Easily Peel the Roasted Peppers
- Remove from the oven and immediately place the peppers in a large zip lock bag and seal or a medium bowl covered with plastic wrap.
- Wait 30 minutes then shake the peppers into a bowl of cold water and peel off the charred skins.
- Cut into small squares and set aside or process with a food processor.
Canning Prep:
Place your canning jars in your dishwasher and wash them without soap.
How to Skin the Tomatoes:
- Boil a large pot of water, stab the tomatoes with a sharp knife and then drop them into the boiling water for about 30 seconds until the skins start to peel back. Lift them out and drop them into a sink of cold water.
- The hot-cold shock allows you to easily remove the peeled skin, and you can core them with a paring knife at the same time before placing them into a large kettle or pot.
Cooking the Salsa:
- Using an emulsifier, break down the tomatoes, leaving a few chunks.
- Add the roasted peppers.
- Pulse the remaining jalapeno peppers banana peppers and onions in a food processor for minimal chopping and add them to the pot.
- Add all remaining ingredients and bring to a boil. Lower the heat and simmer on medium for about 2 hours until the salsa cooks down about an inch and begins to thicken.
Processing the salsa:
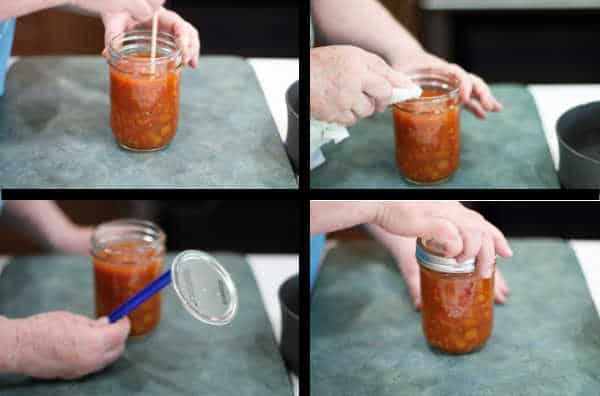
- While the salsa is cooking down, fill your canner with water and bring to a boil.
- In a small saucepan, boil water and then remove it from the heat. Add the canning jar sealing lids to the hot water.
- Place 6 jars into your canning pot full of hot water to heat up.
- Spoon the hot salsa into the hot canning jars leaving 1/4″ at the top. Slide a wooden skewer down the inside of the jar to remove any air bubbles. Clean the lip of the jar with a damp cloth, add a sealing lid and then a twist lid. Place the 6 jars back into the hot water bath, and boil for 20 minutes. 25 minutes for higher altitudes. Remove the jars and place on a protected counter to cool.
Yields: 6 – 500 ml Jars (pint jars)
How to Serve Salsa:
There is nothing better than opening a jar of your homemade salsa. The feeling of satisfaction that you created it, and that it tastes so much better than store-bought. Here are a few ways I like to enjoy my Salsa.
- With a bowl of your favorite tortilla chips – garnished with fresh Cilantro and a sprig of fresh basil.
- In your Burrito Bowls
- As a condiment with a slice of ham or pork
- A side dip for your favorite Mexican dishes
- Mix it with melted cheese and pour over a Nacho plate
Storing Salsa:
- If you do not seal the jars, the salsa will last in the fridge for a week in an airtight container.
- Good frozen for about 6 months
- Canned, it will last years.
Tools Required
- Clean 500 ml (pint) canning jars with sealer and screw lids
- canning tools: jar lifter, jar funnel, ladle, etc.
- canner
- sharp knives, cutting board, Food Processor
- old ugly sheet pan for roasting the peppers, with parchment paper
Oven-Roasted Tangy Roasted Red Pepper Salsa
Equipment
- canner
- canning tools
- Dutch Oven
- sharp knives and cutting boards
- canning jars with lids
- prep bowls
- Food Processor
Ingredients
- 15 – 20 ripe tomatoes = 7 lbs. skinned and cored
- 10 -12 Large Bell Peppers (red, yellow and orange- no green) once roasted, skinned and chopped you need 2-3/4 Cups
- 1-1/2 Cups diced white onion
- 4 – 6 long sweet banana peppers, seeded
- 2 – 3 Jalapeno Peppers, 3 if small, 2 if large – seeded
- 2 Red chili pepper or serrano – seeded
- 2 tbsp crushed garlic
- 2 tsp paprika
- 1 tbsp salt
- 3 tbsp sugar
- 1/2 cup white vinegar
- 1/4 cup red wine vinegar
- 3 tbsp fresh lime juice
Instructions
- Turn the oven broiler to high and set the shelf in the middle of the oven.Seed and cut the bell peppers, laying the pieces flat, skin side up on a parchment-covered sheet pan. Generously pour olive oil over them and place them under a hot broiler until they have blackened.Remove immediately from the sheet pan and place inside a zip-lock bag for at least 1/2 hour, then plunge into a bowl of cold water. These two steps make it super easy to remove the blackened skin.Dice into cubes and set aside or chop with a food processor.
- Bring water to a boil in a Dutch oven, add 6 tomatoes at a time, stab them with a sharp knife and remove after the skin breaks.Fill your clean sink with about 4 inches of cold water and place the hot tomatoes in for a few minutes to cool. Core and skin the tomatoes, placing them into a large bowl.Repeat until all the tomatoes are peeled and cored.Clean your Dutch oven to use in cooking the salsa.
- Canning Prep:*At this time, fill your canner with water and bring to a boil then simmer until jars are ready.Pop your canning jars into the dishwasher and run without soap.
- Cooking the SalsaIn the clean Dutch oven, add the tomatoes and use a immersion blender to roughly break up the tomatoes (potato masher works too).Add your diced roasted peppers and all remaining ingredients Stir well, bring to a boil, and simmer hard for at least an hour or 2 until your salsa cooks down and starts to thicken.Taste and adjust the heat/sweetness to your liking. This is where we decide if we are adding more hot peppers. If you do add more fresh ingredients, cook an additional 15 – 20 minutes.
- Boil a small saucepan of water. Remove from heat and add your sealer lids to warm up.Fill your hot canning jars using the ladle and funnel. leaving 1/2 inch head space.Slide a skewer down the sides of the full jars to release any air bubbles.Add a sealer lid and a screw top.Place in the hot water bath and boil for 20 minutes – 25 minutes at higher altitudes.
- remove from hot water bath and let cool on protected counter
- Test your lids to ensure they are sealed. – try picking the lid up with your fingernails, it should stay secure– tap the lids gently with a wooden spoon, for a deep ding, not a high-pitched ring.
Clicking on a thumbnail link and shopping provides me with a small commission (at no additional cost to you), which supports my website and allows me to continue bringing you new recipes and videos. Thank you for your support. Affiliate and product disclosures are found on my disclosure page.

Below are products I love to use in my kitchen:
Here are the products I used today. Compensated affiliate links used were available at no cost to you.
Clicking on a thumbnail link and shopping provides me with a small commission (at no additional cost to you), which supports my website and allows me to continue bringing you new recipes and videos. I appreciate your support. Affiliate and product disclosures are found on my disclosure page. All products were personally purchased. As always, I was not paid to do this post. I only use and recommend products I love. Click on the icons below each product picture to go to my favorite stores.


- Follow me on INSTAGRAM
- Find me on FACEBOOK
- Subscribe to my YOUTUBE CHANNEL
- Pin my latest recipes on PINTEREST
