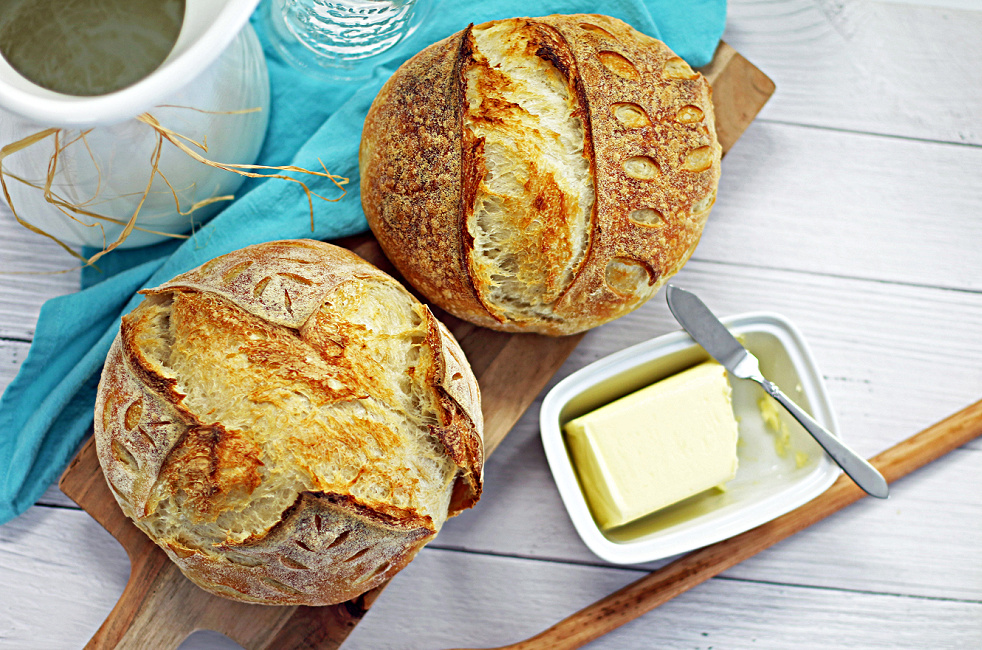
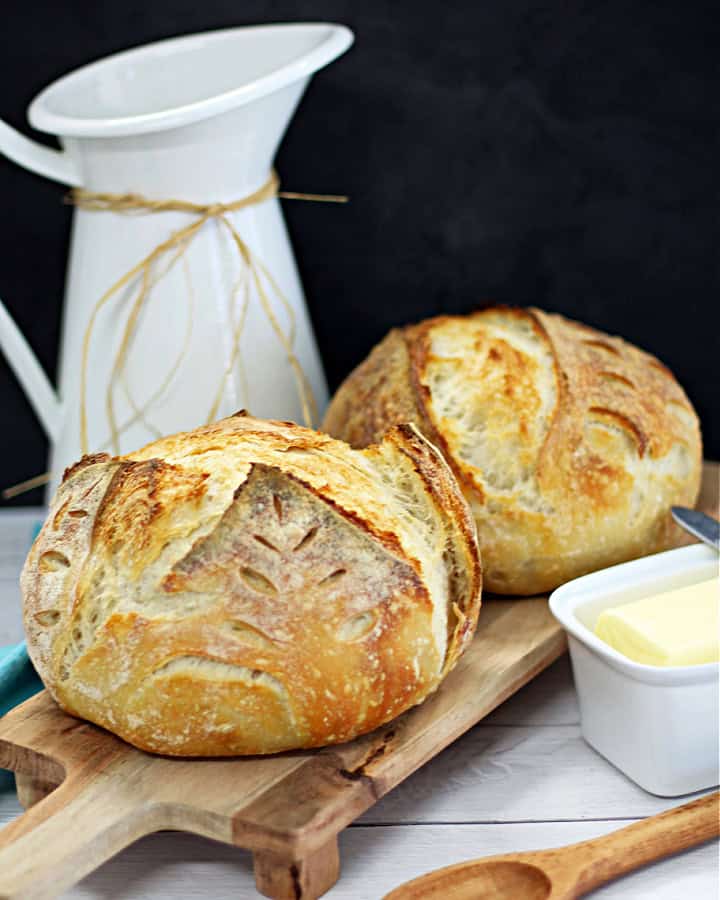
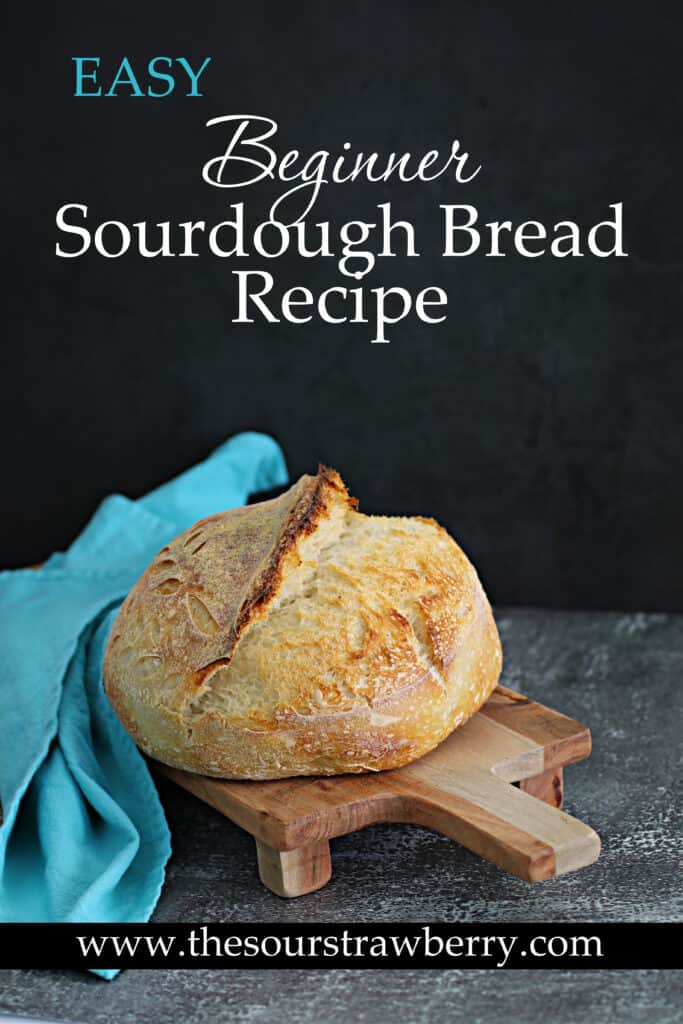
Easy Beginner Sourdough Bread Recipe
Learn how to make this easy beginner’s Sourdough Bread by following the step-by-step instructions, including a baking schedule. You only need a few ingredients, some patience and time.
My first sourdough loaf was not pretty; it wasn’t even edible to be honest, LOL. I was determined to master sourdough so I dug in and kept baking and learning. Now I bake some form of sourdough weekly – and sometimes 2 – 3 times a week for my family and to share with friends.
This is the first sourdough recipe for my new blog, but I have hundreds more to add and, of course, I am always trying new recipes to share. I wanted the first one to be easy so if you are just starting on your sourdough journey, you will have success. This is my “Go To” basic recipe, that I use all the time.
It’s not hard: each step only takes a few minutes, with substantial time between the steps. With a bit of practice, it will become second nature. You’ll build it into your day and become an amazing sourdough baker.
What is Sourdough Bread?
Sourdough Bread does not use commercial yeast to rise. Instead, it is a fermented bread that uses natural wild yeast that has been captured to rise and ferment (sourdough starter).
Sourdough bread is known for having a slightly sour or tangy flavor, and a crisp chewy texture. The naturally occurring acids and a longer fermentation period help break down the gluten making it easier for our bodies to digest and absorb. Plus, it tastes delicious.
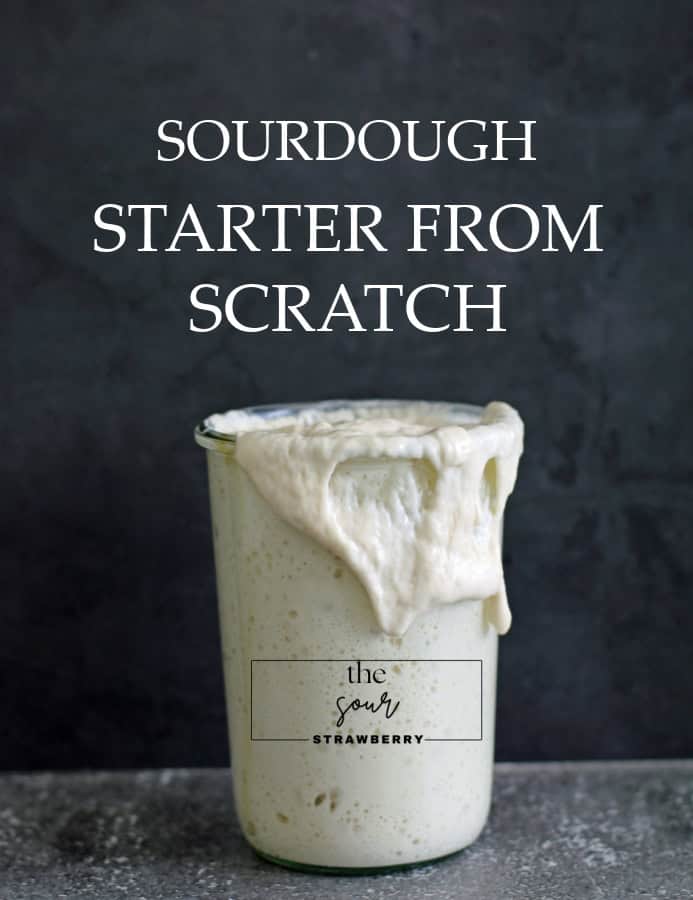
Sourdough Starter:
Your first step in successful sourdough baking is a Sourdough Starter.
Sourdough Starter is created by mixing flour and water together in a jar. Feeding regularly will ensure your starter becomes strong and can be used to bake sourdough bread.
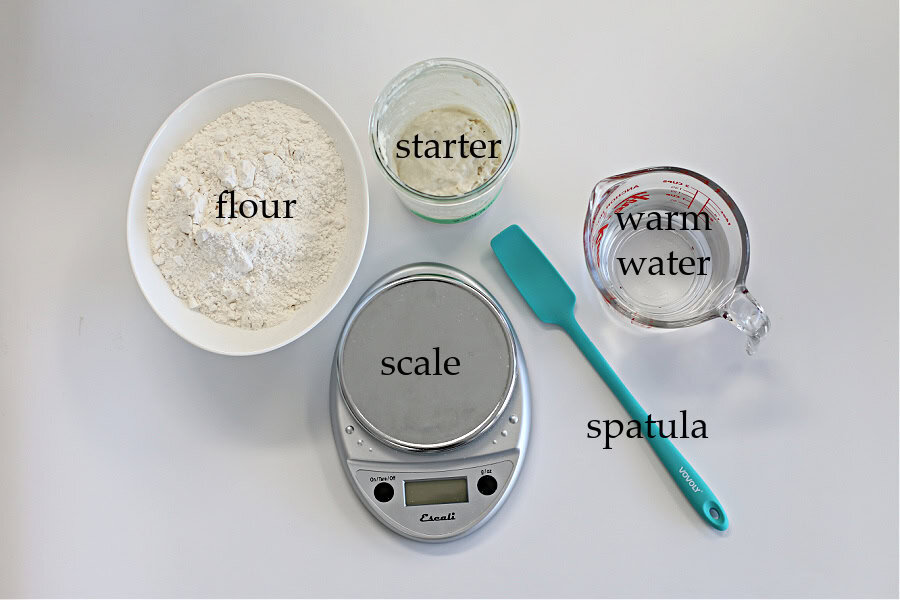
Start the Easy Beginner Sourdough Bread Recipe by feeding your Starter:
The time to do this depends on when you want to bake. I like baking in the early morning, especially in the summer when the house heats up. So, I feed my starter at 8 a.m. the day before I want to bake, and mix the dough before bed. Or, you can feed before bed and mix the dough first thing in the morning.
I like to feed a 1:2:2 ratio. – 1 part starter plus two parts flour and water. For example: 50g starter, 100g flour, 100g water. Ensure your jar is large enough to accommodate the starter more than doubling in size.
Your starter is ready when its doubled in size and has lots of bubbles. This recipe uses 150g of starter, so you will have a little left over.
Our house stays around 68° – 70° and my starter usually doubles by 6 p.m. giving me time to do my stretches and folds.
TIP – place a piece of masking tape on your jar at the full level once you feed. Write the time of feeding on the tape to record how long it takes to double at your house. This is good information to know for future bakes. Also, this time will change based on temp. and humidity during different seasons.
Ingredients for the Easy Beginner Sourdough Bread Recipe
- 500 g Unbleached All-Purpose Flour or Bread Flour
- 325 g Water (I used Brita filtered water that has been sitting for 24 hours to remove the chlorine).
- 10 g Sea Salt
- 150 g Sourdough Starter
- I recommend unbleached all-purpose, but this recipe works with any flour so use what you like and what fits in your budget.
This recipe is a medium-hydration recipe. While this makes the stretch and pulls a little bit sticky, it also results in ease in shaping and scoring, allowing greater success in your overall breadmaking.
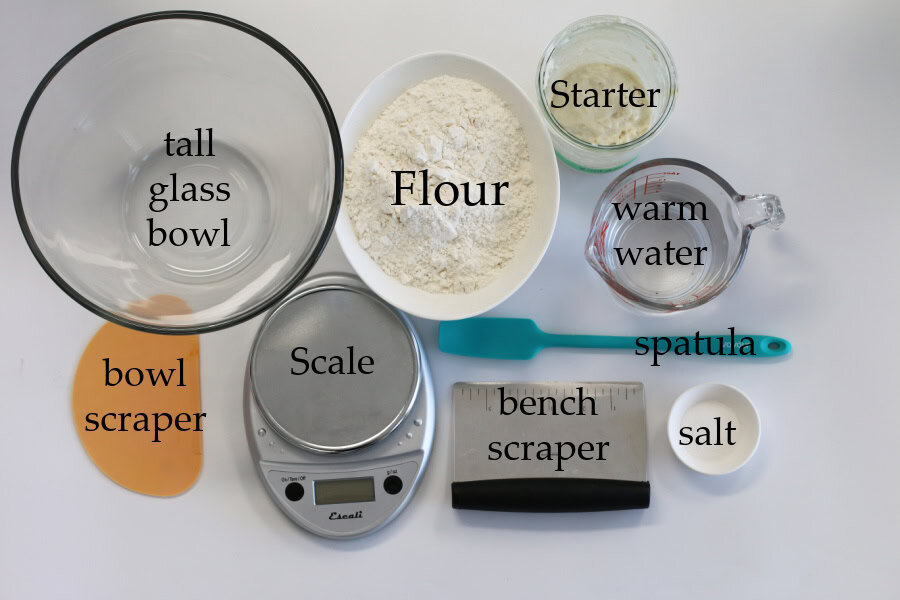
Tools Required for Bread Making:
- Large glass bowl – I like a tall one so I can watch the dough rise
- Bowl scraper for getting the dough out of the bowl when you are ready to shape, also great for cleaning the bowl
- Kitchen scale to accurately measure ingredients
- Bench scraper for cleaning up the counter after shaping and for moving dough to proofing basket.
- Spatula for mixing, a skinny one is great for cleaning the side of your starter jar.
- Banneton/proofing basket
- Dutch oven to bake the bread in
7 Steps to making the Easy Beginner’s Sourdough bread:
- Feed your sourdough starter. Let it rise until doubled, with lots of bubbles on top and down the sides.
- Mix the dough and let it rest for 1 hour on the counter.
- Perform 4 sets of stretch and folds 30 minutes apart.
- Cover the dough with a wet tea towel and let it ferment for 4 – 8 hours the counter until it’s about 50% rise. Time depends on temperature. The hotter your house is, the faster the rise. Watch for a domed top, and the dough pulling away from the sides of the bowl. Have a look at the bottom as well, there should be some nice bubbles formed.
- Shape the dough and place in a banneton (proofing basket).
- Cover with a plastic bag and place in fridge overnight to cold proof.
- Cold from the fridge – score and bake
Sourdough Breadmaking tips:
- Make sure you have a strong healthy starter at its peak – meaning it was fed 4 – 8 hours prior to starting the bread.
- Once the ingredients are mixed, the dough is going to look very shaggy. This is normal, Resist the temptation to add more water. Alternatively, if it’s really sticky, wet your hands before doing your stretch and folds.
- Watch your dough during the fermentation stage to ensure it doesn’t over proof; it should increase about 50% at 76°. It will continue to proof as it cools down in the fridge.
- Use a kitchen scale to measure your ingredients. This is the most accurate way to achieve consistently good results.
STEP #1 – Feed your Starter
8:00 a.m. Take your starter from the fridge, discard (and or start a new jar) and feed it 1:2:2 ratio.
- 50g starter
- 100 g flour
- 100g water
Blend well with a silicone spatula to ensure all the flour becomes wet. Record your time on a piece of masking tape and use it to mark the top of your starter. This will help you determine how long it takes for your starter to double and provides a visual of the same. Loosely cover the starter (1 sheet of paper towel with a rubber band) and let it rest and feed.
In our kitchen (about 70 degrees), the rise can take 8 – 10 hours. It’s faster in the summer months.
STEP #2 – MIX THE DOUGH
6:00 p.m. Once your starter has doubled, transfer 150 g to a large bowl and add 325g of warm water.
Stir together until evenly mixed.
Add 500g of all-purpose (or bread) flour
Add 10g of salt.
Use a spatula and your hands to work this into a shaggy mass, ensuring there is no dry flour.
Cover with a damp tea towel and let sit for 1 hour. This resting period is called “autolyse”. In this hour, the dough will absorb the water making it easier to work with.
STEP #3 STRETCH AND FOLDS
7:00 p.m. – For the next two hours you will stretch and fold every 30 minutes (4 in total).
Wet your hands with water, pick up one edge of the dough, pull it straight up (the stretch), then fold it to the far side of the ball. Turn the bowl 1/4 turn and repeat, turn the bowl another 1/4 turn and repeat, and one more 1/4 turn and repeat for a total of 4 stretch and pulls each of the 4 sessions.
This process adds strength to the dough and helps with the gluten development.
Step #4 FIRST RISE – (bulk fermentation period)
9:00 p.m. Cover with a damp tea towel and let the dough ferment for 4 – 10 hours. Our kitchen is between 68 – 70 degrees so I leave on the counter overnight.
The dough is ready when it has risen 50 – 75%. Don’t let it over-proof. When you shake the bowl, it should jiggle and have a slightly domed top; you should be able to see bubbles on the top, and when you look at the bottom through the glass. It should also pull away from the sides of the bowl easily.
If your kitchen is warmer this may only take 3- 4 hours – in which case, you may want to feed your starter at night, and start this process in the a.m. Simply reverse this entire schedule.
Over-Proofing – Over proofing means your dough fermented too long, becoming very sticky and bubbly. Trying to shape it results in a gooey mess. You can try adding a bit more flour and see if it will shape enough to bake, although you won’t get the rise you normally would. Or, you can place it in the fridge for a day or two and make focaccia bread – or pizza crust. No need to waste it…and start a new batch of bread.
Step #5 SHAPE AND SECOND RISE
7:00 a.m. Prepare your Proofing Basket: Add the cloth insert to your Banneton (proofing basket). Lightly and evenly dust the inside with Rice Flour so the dough will not stick to the cloth.
Using your bowl scraper, turn the dough out onto a lightly floured counter. Flour your fingers and gently spread the dough into a rectangle. Grab the bottom end and fold it over to the center, then grab the top end and fold it to the center. Turn the dough, grab the end, and roll into a ball.
Gently turn the ball with both hands, tucking the bottom under, then gently pull it towards you. The counter will grab the dough and pull on it causing surface tension.
Place the dough upside down in your proofing basket, cover with plastic wrap and then a plastic bag.
Step #6 – Cold Proofing (or “retard” a baker’s term to place in a cold area to proof).
Place the covered dough in your fridge 38° (3°C) overnight.
This allows the fermentation to continue resulting in a stronger flavor and deeper crust coloring. It’s also helpful if you like to do scoring designs. Cold dough is easier to score.
Step #7 – Scoring and Baking
7:00 a.m. – 9:00 a.m. prepare to score and then bake.
Place your covered Dutch oven inside your oven and preheat to 450°. Once your oven is preheated, remove your dough from the fridge.
Remove the bag and plastic and using a large piece of parchment paper, place over the dough and flip out onto your counter. (the dough will now be right side up).
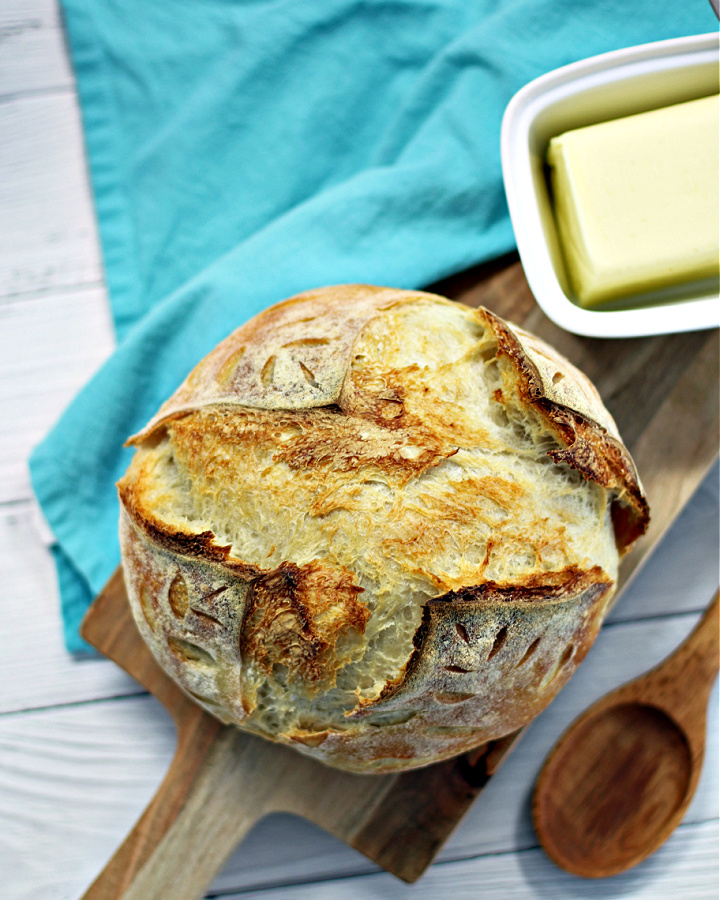
Lightly flour the bread surface and do your light decorative scores first on one side of the bread and then the release score (the large 1/2″ deep one down the other side of the dough). It’s much harder to score the decorative scores after the deep release score has been done.
Using thick oven mitts, open your oven, remove the Dutch oven, then the lid. Use the parchment paper to pick up your dough and place it inside your Dutch oven, cover it and place back in the oven.
Bake at 450° for 35 minutes, remove the lid and bake for another 18 – 20 minutes until you attain the brownness you desire
Remove the baked bread from oven and check the temperature with your thermometer. To ensure it’s baked through, you want an internal temperature of between 205° and 210°.
NOTE: – do not cut your bread open for at least 1 – 2 hours, or you will end up with a gummy crumb.
Storing Leftovers:
Once the bread is completely cooled, I like to slice it and freeze it in an airtight bag. Alternatively, you can freeze the entire loaf. Once thawed, place it in a 450° oven for a few minutes to warm up.
Visit my AMAZON STORE – for recommendations on products I like to use
Easy Beginner Sourdough Bread Recipe
Equipment
- large glass mixing bowl
- Spatula
- kitchen scale
- bowl scraper
- Dutch Oven
- Banneton/proofing basket
- razor blade
Ingredients
- 150g Bubbly FED Starter
- 325g Water
- 10g Salt
- 500g Flour (all-purpose)
Instructions
- Step #1 – Feed Your StarterTake your starter from the fridge, discard (and/or start a new jar) and feed it 1:2:2 ratio50g start100g flour100g waterBlend well with a silicone spatula to ensure the flour becomes wet. Cover and let feed until it doubles in size.
- Step #2 – Mix the DoughOnce your starter has doubled, transfer 150g to a large glass bowl and add 325g of warm water. Stir until evenly mixedAdd 500g of all-purpose flourAdd 10g of saltMix using your spatula and hands to work this into a shaggy mass, ensuring there is no dry flour.Cover with a damp tea towel and let sit for 1 hour.
- Step #3 – Stretch and FoldsStretch and fold every 30 minutes for the next 2 hours – 4 in total.Wet your hands with water, pull the dough straight up then towards you and down. Turn the bowl 1/4 turn, repeat. Repeat 2 more times for a total of 4 every 30 minutes.
- Step #4 – First Rise (bulk Fermentation period)Cover the dough with the damp tea towel and let the dough ferment for 4 – 8 hours. The dough is ready when it has risen 50 – 75%. The time this takes depends on the temperature in your kitchen. (Cooler temps – longer fermentation).
- Step #5 – Shape and Second RiseAdd the cloth insert to your Banneton (proofing basket) and lightly and evenly dust the inside with rice flour so the dough will not stick to the cloth.Using the bowl scraper, turn the dough out onto a lightly floured counter. Flour your fingers and gently spread the dough into a rectangle. Grab the bottom end and fold it over to the center, then grab the top end and fold it to the center. Turn the dough, grab the end and roll into a ball.Gently turn the ball with both hands, tucking the bottom under, then gently pull it towards you. The counter will grab the dough and pull on it causing surface tension in the dough.Place the dough upside down in your proofing basket, cover with a plastic wrap and then a plastic bag.
- Step #6 – Cold ProofingPlace the covered dough into your fridge overnight. 12 – 48 hours.
- Step #7 – Scoring and BakingPlace your covered Dutch oven inside the oven and preheat to 450°. Once your oven is preheated, remove your dough from the fridge.Remove the bag and plastic and using a large piece of parchment paper, place over the dough and flip it out onto your counter. (the dough will now be right side up).Use a razor blade to score your decorative scores on one side and then the release score (1/2" deep) down the other side of the bread holding the razor blade at 45° from the bread. Using thick oven mitts, remove your hot Dutch oven from the oven, use the tips of the parchment paper to move your dough into the Dutch oven. Cover with the lid and bake for 34 minutes at 450°.Remove the lid and bake for another 18 – 22 minutes also at 450° until you attain the desired brownness.Remove from the oven and use a thermometer to check the temperature. You want the inside between 205° and 210° to ensure it's cooked through.Place on a cooling rack for at least 2 hours before cutting.

What size dutch oven do you use? And any suggestions on the banneton proofing baskets?
Hi Maria, I use a 7 quart, I added some links for you to my Amazon store so you can see the size of banneton proofing baskets I use for this recipe. Hope that helps